玄箱 を Debian etch化する(初期化後 -> etch)
玄箱 を Debian etch化する
もう何度目でしょうか、玄箱 を Debian 化し、etchへとアップグレードします。
etchへのアップグレードは、woody -> sarge -> etchへと段階を踏む必要があるようです。
玄箱うぉううぉう♪さんで公開されている debian_2006_06_10_dist.tgz をダウンロード し、転送元PCと玄箱の閉じたネットワークを構築しインストールの準備をします。
玄箱は、IPアドレスの取得を試みるのでDHCPサーバの無い環境を用意します。(玄箱のセットアッププログラムを使う場合は別です。)
この作業は、ハードディスクを初期化します。必要なものがあれば、バックアップします。
玄箱 Debianの woody -> sarge -> etch 手順
- 玄箱を Debian化(woody)
- 玄箱を初期化(EMモード)
- Debianイメージ の インストール
- ネットワーク環境の設定
- rootのパスワード変更とユーザー設定
- 玄箱を sarge化
- sargeへアップグレード
- haltの修正
- ProFTPdのエラー
- eximのエラー
- 玄箱を etch化
- etchへアップグレード
EMモードと初期化
玄箱をインストール可能な状態にするため、玄箱うぉううぉう♪から write_ng.tgzをダウンロードして任意のディレクトリに展開します。
rootで玄箱にログインし次の方法のいづれかで玄箱をEMモードにします。 私の環境は、(1)でEMモードにしました。
(1) /dev/fl3があるなら以下のコマンドを実行します。

    # ./write_ng > /dev/fl3
    # reboot

(2) EMなユーザーランドを適当な場所にマウント、その中の/dev/fl3に対して実行します。

    # mount -t ext2 /dev/ram0 /cdrom
    # ./write_ng > /cdrom/dev/fl3
    # reboot

(3) デバイスファイルを作ってそれに対して実行します。

    # mknod /dev/fl3 b 250 3
    # ./write_ng > /dev/fl3
    # reboot
telnetで接続し、KURO-BOX-EMと表示されることを確認します。
rootでログインし、次のコマンドを実行してパーティションを再作成します。
# /sbin/mfdisk -e /dev/hda
# sh /sbin/mkfilesystem.sh
以上で初期化は完了します。
過去のコンテンツ:
玄箱をDebian化してみる
玄箱をDebian化する(再構築)
Debianイメージ の インストール
玄箱うぉううぉう♪さんからダウンロードしておいた debian_2006_06_10_dist.tgz をftpで玄箱 の /mnt2/share に アップロード(put) します。
telnetで 玄箱 にログインし /mnt に debian_2006_06_10_dist.tgz を展開します。
# cd /mnt
# tar zxvf /mnt2/share/debian_2006_06_10_dist.tgz
ネットワーク環境の設定
ネットワーク環境を自分の環境に合うように変更します。
ホスト名の変更
デフォルトではホスト名がKURO-BOXです。そのままでもいいのですが、/etc/hostnameを編集して 好みのホスト名に変更します。
# vi /etc/hostname
hostsの設定
/mnt/etc/hostsを編集します。
192.168.***.*** KURO-BOX
ネットワークの設定
/mnt/etc/network/interfacesを編集しネットワーク環境を調整します。
address 192.168.***.***
network 192.168.***.0
netmask 255.255.255.0
broadcast 192.168.***.255
gateway 192.168.***.***
アクセス制御の設定
/mnt/etc/hosts.allowを編集
ALL : 192.168.***.0/255.255.255.0
ALL : 127.0.0.1
DNSサーバの設定
/mnt/etc/resolv.confを編集
nameserver 192.168.***.***
ネットワーク環境の変更が終了したら、EMモードから抜けます。
echo -n 'OKOK' > /dev/fl3
reboot

又は

# /usr/bin/write_ok
reboot
rootのパスワード変更とユーザー設定
Debian 化された玄箱に telnet でログインします。 インストール後ログイン可能なユーザーは、tmp-kunのみになります。 ユーザー名:tmp-kun、パスワード:tmp-kunでログインします。
ログインしたらrootのパスワードを変更します。
[tmp-kun@KURO-BOX:]# su -
password: root
[root@KURO-BOX:]#
[root@KURO-BOX:]# passwd
Enter new UNIX password: (新しいパスワードを入力)
Retype new UNIX password: (同じものをもう一度入力)
passwd: password updated successfully
[root@KURO-BOX:]#
次に新規のユーザーを作成します。
[root@KURO-BOX:]# adduser hoge
Adding user hoge...
Adding new group hoge (1001).
Adding new user hoge (1001) with group hoge.
Creating home directory /home/hoge.
Copying files from /etc/skel
Enter new UNIX password: (新しいパスワードを入力)
Retype new UNIX password: (同じものをもう一度入力)
passwd: password updated successfully
Changing the user information for hoge
Enter the new value, or press return for the default
         Full Name []:
         Room Number []:
         Work Phone []:
         Home Phone []:
         Other []:
Is the information correct? [y/n] y
新しく作成したユーザーでログインできることを確認し、tmp-kunユーザーを削除します。
[root@KURO-BOX:]# deluser --remove-home tmp-kun
Looking for files to backup/remove...
Removing files...
Removing user tmp-kun...
done.
玄箱をsarge化する
sources.listのwoodyをsargeへ変更します。
# vi /etc/apt/sources.list


# 例えば、
deb http://ring.asahi-net.or.jp/archives/linux/debian/debian sarge main contrib non-free
deb http://ring.asahi-net.or.jp/archives/linux/debian/debian-non-US sarge/non-US main contrib non-free
aptを使用してsargeへアップグレードします。
$ su
Password:(rootのパスワードを入力)
# apt-get update
# apt-get dist-upgrade
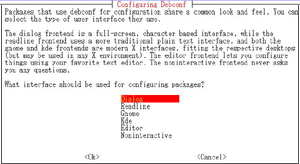
Configuring Debconf(interface) -> Enter[dialog]
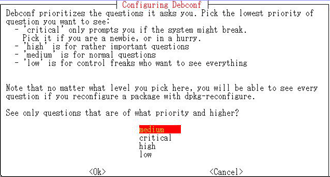
See only questions that are of what priority and higher? -> Enter[medium]
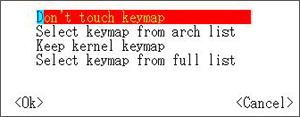
Configuring Console-data(keymap) -> Enter[Don’t touch keymap]。
Adduser -> Enter[system wide readable home directories:No]
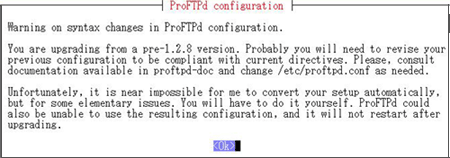
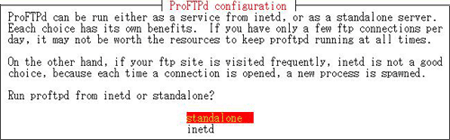
ProFTPd configuration -> Enter
Run proftpd from inetd or standalone? -> Enter[standalone]
Configuring man-db -> Enter[No]

Configuring Setserial -> Enter[autosave once]
**Type of automatic serial port configuration to use?**と聞かれるので Enterを押します。
Do you want to upgrade glibc now? [Y/n] -> Enter[Y]
Do you wish to restart services? [Y/n] -> Enter[Y]
/etc/init.d/halt -> [Y]
Configuration file \`/etc/init.d/halt'
 ==> Modified (by you or by a script) since installation.
 ==> Package distributor has shipped an updated version.
   What would you like to do about it ?  Your options are:
    Y or I  : install the package maintainer's version
    N or O  : keep your currently-installed version
      D     : show the differences between the versions
      Z     : background this process to examine the situation
 The default action is to keep your current version.
*** halt (Y/I/N/O/D/Z) [default=N] ?
/etc/securetty -> [Y]
Configuration file `/etc/securetty'
 ==> Modified (by you or by a script) since installation.
 ==> Package distributor has shipped an updated version.
   What would you like to do about it ?  Your options are:
    Y or I  : install the package maintainer's version
    N or O  : keep your currently-installed version
      D     : show the differences between the versions
      Z     : background this process to examine the situation
 The default action is to keep your current version.
*** securetty (Y/I/N/O/D/Z) [default=N] ?
May I update your system? [Y/n] -> Enter[Y]
/etc/modutils/aliases -> [Y]
Configuration file `/etc/modutils/aliases'
 ==> Modified (by you or by a script) since installation.
 ==> Package distributor has shipped an updated version.
   What would you like to do about it ?  Your options are:
    Y or I  : install the package maintainer's version
    N or O  : keep your currently-installed version
      D     : show the differences between the versions
      Z     : background this process to examine the situation
 The default action is to keep your current version.
*** aliases (Y/I/N/O/D/Z) [default=N] ?
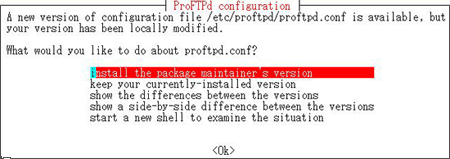
ProFTPd configuration -> install the package maintainer’s version
haltの設定
haltの設定を修正します。
# cd /etc/init.d
# vi halt
PATHの設定の次に以下の行を追加します。
echo -n "EEEE" > /dev/AVR00
sleep 3
新しいターミナルから玄箱に接続 Debian GNU/Linux 3.1 と表示されればSargeへアップグレード完了です。 再起動します。
ProFTPDのエラー
ProFTPDが unable to determine IP address… とエラー表示されました。
そこで調べてみると名前解決の問題のようです。
hostsを次のように修正するか、proftpd.confを修正すると解決します。
127.0.0.1 ホストネーム localhost localhost.localdomain
又は、/etc/proftpd.confを修正
UseReverseDNS off
eximのエラー
sarge化の最後に次のようなエラーが表示されました。
Errors were encountered while processing:
 exim
 mailx
E: Sub-process /usr/bin/dpkg returned an error code (1)
メールサーバがらみのエラーのようなので念のため修復をしてくれる次のコマンドを実行してみました。
# apt-get -f install
Reading Package Lists... Done
Building Dependency Tree... Done
0 upgraded, 0 newly installed, 0 to remove and 0 not upgraded.
2 not fully installed or removed.
Need to get 0B of archives.
After unpacking 0B of additional disk space will be used.
Setting up exim (3.36-16sarge1) ...
exim 3.x and 4.x
================
This is a package of exim 3.x. This is no longer supported upstream, and only
remains in debian to support users with existing exim 3 installations. We strongly
reccommend exim 4.x (which is in the exim4 package) for new installations. We
suggest users with existing exim 3 installations consider upgrading, particularly
if they have fairly simple configurations.
* Press return to continue
hostname: Unknown host
hostname --fqdn gave non-zero exit code 256
dpkg: error processing exim (--configure):
 subprocess post-installation script returned error exit status 1
dpkg: dependency problems prevent configuration of mailx:
 mailx depends on exim4 | mail-transport-agent; however:
  Package exim4 is not installed.
  Package mail-transport-agent is not installed.
  Package exim which provides mail-transport-agent is not configured yet.
dpkg: error processing mailx (--configure):
 dependency problems - leaving unconfigured
Errors were encountered while processing:
 exim
 mailx
E: Sub-process /usr/bin/dpkg returned an error code (1)
今回、メール環境は必要ないため削除することにしました。
# apt-get remove exim
# apt-get -f installでもう一度確認してみます。
# apt-get -f install
etch へアップグレードします
sources.listのsargeをetchへ変更します。
# vi /etc/apt/sources.list


# 例えば、
deb http://ring.asahi-net.or.jp/archives/linux/debian/debian etch main contrib non-free
deb http://ring.asahi-net.or.jp/archives/linux/debian/debian-non-US etch/non-US main contrib non-free
aptitudeを使用してetchへアップグレードします。
新しいリリースで利用可能なパッケージの一覧を取得します。
# aptitude update
Debianのサイトにある 「 以前のリリースからアップグレードする」(4.5.2-4.5.4)に従って、最小アップグレードを実行します。
sarge で必要なパッケージの一部と etch で必要なパッケージの一部が衝突するそうです。
# aptitude upgrade
リリースノートにあるように、initrd-toolsをインストールします。
# aptitude install initrd-tools
etchへ完全なアップグレードを行います。
# apt-get dist-upgrade
いくつか質問されます。
/etc/init.d/halt -> [Y]
Configuration file `/etc/init.d/halt'
 ==> Modified (by you or by a script) since installation.
 ==> Package distributor has shipped an updated version.
   What would you like to do about it ?  Your options are:
    Y or I  : install the package maintainer's version
    N or O  : keep your currently-installed version
      D     : show the differences between the versions
      Z     : background this process to examine the situation
 The default action is to keep your current version.
*** halt (Y/I/N/O/D/Z) [default=N] ?
/etc/init.d/reboot -> [Y]
Configuration file `/etc/init.d/reboot'
 ==> Modified (by you or by a script) since installation.
 ==> Package distributor has shipped an updated version.
   What would you like to do about it ?  Your options are:
    Y or I  : install the package maintainer's version
    N or O  : keep your currently-installed version
      D     : show the differences between the versions
      Z     : background this process to examine the situation
 The default action is to keep your current version.
*** reboot (Y/I/N/O/D/Z) [default=N] ?
ProFTPd configuration -> Enter
haltとrebootが書き換わっているので修正します。
/etc/init.d/haltのPATH設定の下に以下のように追加します。
echo -n "EEEE" > /dev/ttyS1
halt -d -f -i $poweroff $hddown
/etc/init.d/rebootのPATH設定の下に以下のように追加します。
echo -n "CCCC" > /dev/ttyS1
reboot -d -f -i
再起動します。
# reboot
起動後telnetで接続して次のように表示されることを確認します。
Debian GNU/Linux 4.0
以上でetch化が終了です。