Zabbix 5.4 をインストールする
以前、少しだけ zabbix に触れてみたのですが、実際に使用することがなく放置していました。あらためて監視系のツールを学んでみたいと思いましたので、手始めに Raspberry Pi に Zabbix を導入したいと思います。
環境
- Raspberry Pi 3 model B+
- Raspbian Buster 版
- Zabbix 5.4
Zabbix サーバーに必要な環境
Zabbix のダウンロードサイトを確認すると、導入したい Zabbix のバージョンや OS の種別 , OS のバージョン,使用する Database , Web サーバーを選択するようになっています。
また、インストールドキュメントを確認すると、 PHP の 7.2.5 以降が必要です。
ここでは、次の環境で Zabbix サーバーを構築していきます。
- Web サーバー:Apache 2.4.38 (Raspbian)
- PHP 7.4
- データベース:MariaDB
Apache のインストール
Apache2 をインストールします。
pi@raspberrypi:~ $ sudo apt install apache2
Apache のインストールは以上です。
PHP のインストール
PHP のインストール準備(パッケージリポジトリーの追加)
はじめに、SURY PPA リポジトリを使用する上で必要なパッケージのインストールを行います。
pi@raspberrypi:~ $ sudo apt install apt-transport-https ca-certificates
SURY PPA リポジトリを使用する時に必要になる GPG キーファイルをダウンロードします。
pi@raspberrypi:~ $ sudo wget -O /etc/apt/trusted.gpg.d/php.gpg https://packages.sury.org/php/apt.gpg
SURY PPA リポジトリを apt のリポジトリソースリストへ追加します。
pi@raspberrypi:~ $ echo "deb https://packages.sury.org/php/ $(lsb_release -sc) main" | sudo tee /etc/apt/sources.list.d/php.list
SURY PPA リポジトリを追加したので、パッケージ一覧を更新します。
pi@raspberrypi:~ $ sudo apt update
インストールされているパッケージを更新します。
pi@raspberrypi:~ $ sudo apt upgrade
ここまでで、 PHP 7.4 をいんすとーるする準備ができました。
PHP 7.4 のインストール
PHP 7.4 をインストールします。
pi@raspberrypi:~ $ sudo apt install php7.4
以上でインストールが完了します。
インストールされた PHP を確認するには、次のコマンドを実行します。
pi@raspberrypi:~ $ php --version
PHP 7.4.27 (cli) (built: Dec 20 2021 21:32:33) ( NTS )
Copyright (c) The PHP Group
Zend Engine v3.4.0, Copyright (c) Zend Technologies
    with Zend OPcache v7.4.27, Copyright (c), by Zend Technologies
PHP 7.4 がインストールされたことを確認できました。
必要な拡張モジュールのインストール
Zabbix のドキュメントに PHP で必要な拡張モジュールが記載されています。
pi@raspberrypi:~ $ sudo apt install php7.4-gd php7.4-bcmath php7.4-xml php7.4-ldap php7.4-mbstring php7.4-mysql
導入した 拡張モジュールの mbstring が使えるように php.ini を修正します。
pi@raspberrypi:~ $ sudo vi /etc/php/7.4/apache2/php.ini
設定ファイルの中から次の部分を検索し、コメントアウトされている部分を解除します。
...
[mbstring]
; language for internal character representation.
; This affects mb_send_mail() and mbstring.detect_order.
; http://php.net/mbstring.language
mbstring.language = Japanese      <== コメントアウトを解除
...
修正したら保存しておきます。
php-fpm のインストール
Apache から PHP を実行できるように php-fpm をインストールしていきます。
pi@raspberrypi:~ $ sudo apt install php7.4-fpm
インストールが終わったら、 Apache を再起動しておきます。
pi@raspberrypi:~ $ sudo systemctl restart apache2
php-fpm の動作確認
php-fpm が機能しているか動作確認を行っておきます。
Apache のドキュメントルートに、次のファイル「info.php」を作成して動作確認を行います。
pi@raspberrypi:~ $ sudo vi /var/www/html/info.php
info.php には、次のように入力しておきます。
<?php
    phpinfo();
?>
ブラウザから「http://IP アドレス/info.php」へアクセスして、 PHP の情報が一覧表示されることを確認します。
正しく表示されれば、 Apache ・ PHP 関係のインストールは完了です。
データベース MariaDB のインストール
MySQL と互換性の高い MariaDB をインストールしていきます。
pi@raspberrypi:~ $ sudo apt install mariadb-server-10.3
MariaDB の初期設定
「mysql_secure_installation」スクリプトを使用して、MariaDB の初期設定を行います。
pi@raspberrypi:~ $ sudo mysql_secure_installation

NOTE: RUNNING ALL PARTS OF THIS SCRIPT IS RECOMMENDED FOR ALL MariaDB
      SERVERS IN PRODUCTION USE!  PLEASE READ EACH STEP CAREFULLY!

In order to log into MariaDB to secure it, we'll need the current
password for the root user.  If you've just installed MariaDB, and
you haven't set the root password yet, the password will be blank,
so you should just press enter here.

Enter current password for root (enter for none):    <== [enter]を押す
OK, successfully used password, moving on...

Setting the root password ensures that nobody can log into the MariaDB
root user without the proper authorisation.

Set root password? [Y/n] y   <== rootパスワード設定するため、[y]を入力
New password:            <== パスワードを入力
Re-enter new password:   <== 再度パスワードを入力
Password updated successfully!
Reloading privilege tables..
 ... Success!


By default, a MariaDB installation has an anonymous user, allowing anyone
to log into MariaDB without having to have a user account created for
them.  This is intended only for testing, and to make the installation
go a bit smoother.  You should remove them before moving into a
production environment.

Remove anonymous users? [Y/n] y    <== 匿名ユーザーを削除。[y]を入力
 ... Success!

Normally, root should only be allowed to connect from 'localhost'.  This
ensures that someone cannot guess at the root password from the network.

Disallow root login remotely? [Y/n] y    <== リモート接続を無効にする。[y]を入力
 ... Success!

By default, MariaDB comes with a database named 'test' that anyone can
access.  This is also intended only for testing, and should be removed
before moving into a production environment.

Remove test database and access to it? [Y/n] y    <== 初期データベースを削除する。[y]を入力
 - Dropping test database...
 ... Success!
 - Removing privileges on test database...
 ... Success!

Reloading the privilege tables will ensure that all changes made so far
will take effect immediately.

Reload privilege tables now? [Y/n] y    <== 設定した内容を反映するため、[y]を入力
 ... Success!

Cleaning up...

All done!  If you've completed all of the above steps, your MariaDB
installation should now be secure.

Thanks for using MariaDB!
権限の変更
「mysql」 コマンドを sudo 無しで使えるように権限設定しておきます。
pi@raspberrypi:~ $ sudo mysql -u root -p
Enter password:
Welcome to the MariaDB monitor.  Commands end with ; or \g.
Your MariaDB connection id is 64
Server version: 10.3.27-MariaDB-0+deb10u1 Raspbian 10

Copyright (c) 2000, 2018, Oracle, MariaDB Corporation Ab and others.

Type 'help;' or '\h' for help. Type '\c' to clear the current input statement.

MariaDB [(none)]> grant all privileges on *.* to root@localhost identified by '設定したパスワード' with grant option;
Query OK, 0 rows affected (0.001 sec)

MariaDB [(none)]> flush privileges;
Query OK, 0 rows affected (0.001 sec)

MariaDB [(none)]> quit
Bye
以上で、データベースの準備は完了です。
Zabbix のインストール
Zabbix のダウンロードサイトにあるように、 Zabbix リポジトリをインストールしていきます。
Zabbix のサイトからリポジトリファイルをダウンロードします。ここでは、「/usr/local/src」ディレクトリにダウンロードしています。
pi@raspberrypi:/usr/local/src $ wget https://repo.zabbix.com/zabbix/5.4/raspbian/pool/main/z/zabbix-release/zabbix-release_5.4-1+debian10_all.deb
次に、ダウンロードしたリポジトリファイルを使用して Zabbix リポジトリを追加します。
pi@raspberrypi:/usr/local/src $ sudo dpkg -i zabbix-release_5.2-1+debian10_all.deb
パッケージの一覧を更新します。
pi@raspberrypi:/usr/local/src $ sudo apt update
Zabbix server , frontend , agent のインストール
ダウンロードサイトの説明に従い Zabbix server , frontend , agent をインストールします。
pi@raspberrypi:~ $ sudo apt install zabbix-server-mysql zabbix-frontend-php zabbix-apache-conf zabbix-agent zabbix-sql-scripts
データベース環境の構築
Zabbix 用にデータベースの構築とユーザーを用意します。
ここでは、次のように作成しています。
- データベース名:zabbix
- ユーザー名:zabbix
- パスワード:任意
pi@raspberrypi:~ $ sudo mysql -u root -p
Enter password:   <== MariaDB の root パスワードを入力
Welcome to the MariaDB monitor.  Commands end with ; or \g.
Your MariaDB connection id is 59
Server version: 10.3.27-MariaDB-0+deb10u1 Raspbian 10

Copyright (c) 2000, 2018, Oracle, MariaDB Corporation Ab and others.

Type 'help;' or '\h' for help. Type '\c' to clear the current input statement.

MariaDB [(none)]> create database zabbix character set utf8 collate utf8_bin;   <== データベースを作成
Query OK, 1 row affected (0.001 sec)

MariaDB [(none)]> create user zabbix@localhost identified by 'password';   <== ユーザを作成
Query OK, 0 rows affected (0.001 sec)

MariaDB [(none)]> grant all privileges on zabbix.* to zabbix@localhost;   <== 権限設定
Query OK, 0 rows affected (0.001 sec)

MariaDB [(none)]> quit
Bye
初期スキーマ及びデータのインポート
作成した「 zabbix 」データベースに、 Zabbix で使用する初期スキーマとデータをインポートします。
pi@raspberrypi:~ $ zcat /usr/share/doc/zabbix-sql-scripts/mysql/create.sql.gz | mysql -uzabbix -p zabbix

Enter password:   <== MariaDB の root パスワードを入力
※ 止まっているのかと思うくらい時間がかかりました。
zabbix の設定ファイルへデータベース接続パラメータを設定
「/etc/zabbix/zabbix_server.conf」に MariaDB に接続するためのパスワードを設定します。
「DBPassword」の部分を検索して、データベースに設定したパスワードを設定します。
pi@raspberrypi:~ $ sudo vi /etc/zabbix/zabbix_server.conf

### Option: DBPassword
#       Database password.
#       Comment this line if no password is used.
#
# Mandatory: no
# Default:
# DBPassword=
DBPassword=password  <== MariaDB のパスワード
Zabbix サーバおよび agent プロセスの起動
Zabbix サーバおよび agent プロセスを起動と、 Apache を再起動します。
pi@raspberrypi:~ $ sudo systemctl restart zabbix-server zabbix-agent apache2
起動時に、 Zabbix サーバと agent プロセスが自動起動するように設定しておきます。
pi@raspberrypi:~ $ sudo systemctl enable zabbix-server zabbix-agent
ここまでで、コマンドラインを使ったインストール作業は完了です。
残りは、ブラウザーを使って設定していきます。
Zabbix フロントエンドの設定
ブラウザから、Zabbix をインストールした端末へアクセスします。
http://IP アドレス/zabbix/
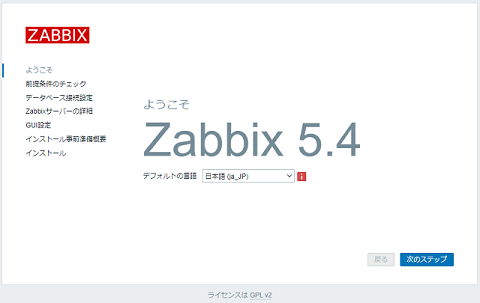
「ようこそ」画面が表示されるので、「デフォルトの言語」を変更し、「次のステップ」ボタンをクリックします。
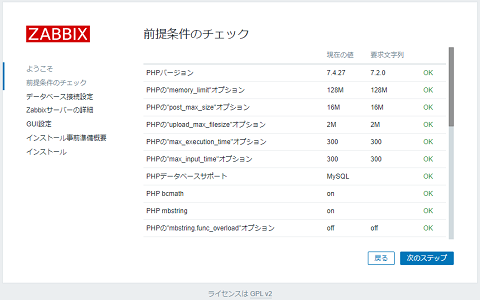
PHP のバージョンや拡張モジュールなど前提条件がクリアされているかどうか一覧表示されます。必須要件でないものは、「警告」と表示されます。前提条件に問題がない場合、「次のステップ」ボタンをクリックします。
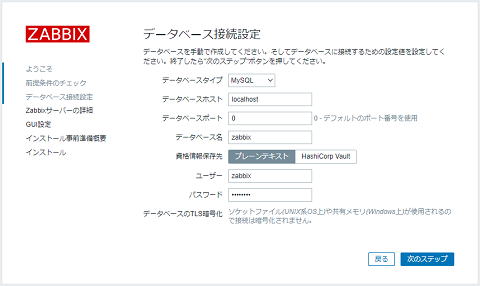
「データベース接続設定」画面が表示されるので、 Zabbix インストール時に用意したデータベースへの接続設定を入力します。
- データベースタイプ:MySQL
- データベースホスト:localhost
- データベースポート:0
- データベース名:作成したデータベース名「zabbix」を入力
- 資格情報保存先:プレーンテキスト
- ユーザー:作成したデータベースユーザー名「zabbix」と入力
- パスワード:作成したデータベースユーザーのパスワードを入力
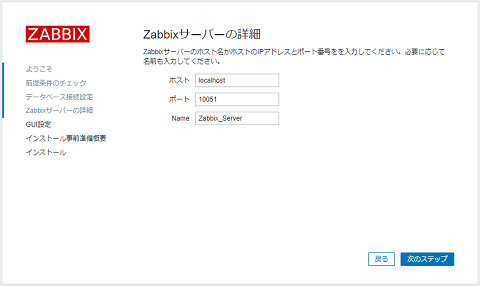
「Zabbix サーバの詳細」画面に Zabbix サーバーの情報を入力します。
- ホスト:localhost
- ポート:10051
- Name:ここでは、「Zabbix_Server」と入力しています。
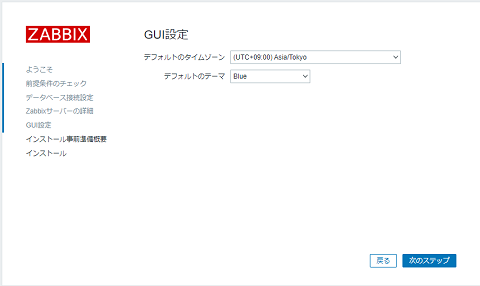
「GUI 設定」画面にデフォルトのタイムゾーンとテーマを設定し、「次のステップ」ボタンをクリックします。
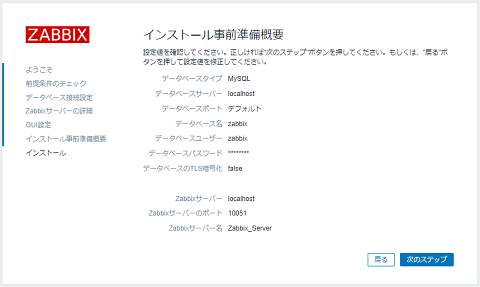
ここまでの設定が表示されるので確認し、「次のステップ」ボタンをクリックします。
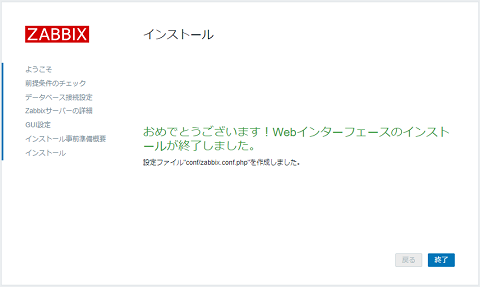
全ての設定が終わると、次の画面が表示されるで、「終了」ボタンをクリックします。
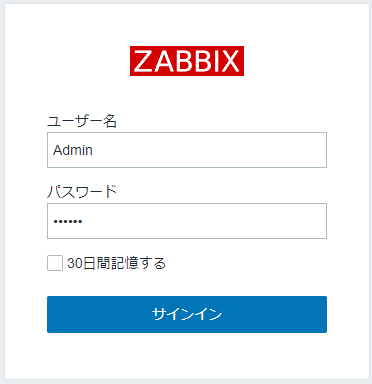
ログイン
ログイン画面が表示されるので、ユーザー名およびパスワードを入力し「サインイン」ボタンをクリックします。
※デフォルトのユーザー名は Admin 、パスワード zabbix になります。
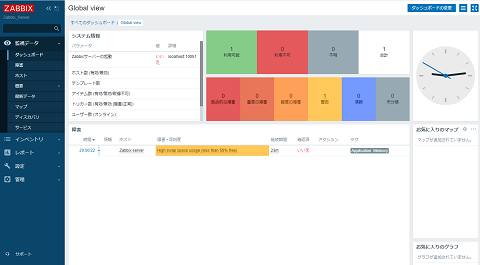
次の画面が表示されれば、 Zabbix のインストールおよび設定は完了です。
以上で Zabbix を使用するための準備ができました。