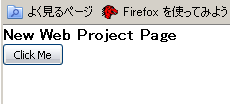
ボタンを作るにはinputタグで作ることが出来るのですが、ここではExt JSで作成します。

基本となるHTMLを作成します。bodyへdivタグを追加し、idにsample_buttonを設定します。
<!DOCTYPE HTML PUBLIC "-//W3C//DTD HTML 4.01 Transitional//EN"
"http://www.w3.org/TR/html4/loose.dtd">
<html xmlns="http://www.w3.org/1999/xhtml">
    <head>
        <meta http-equiv="Content-Type" content="text/html; charset=utf-8" />
        <link rel="stylesheet" type="text/css" href="ext/resources/css/ext-all.css">
        <script type="text/javascript" src="ext/adapter/ext/ext-base.js"></script>
        <script type="text/javascript" src="ext/ext-all-debug.js"></script>
        <script type="text/javascript" src="main.js"></script>
        <title>New Web Project</title>
    </head>
    <body>
        <h1>New Web Project Page</h1>
        <div id="sample_button"></div>
    </body>
</html>
JavaScript用のファイル(main.js)を作成します。
Ext.BLANK_IMAGE_URL = 'ext/resources/images/default/s.gif';

Ext.onReady(function() {
  new Ext.Button({
    renderTo : 'sample_button',
    text: 'Click Me'
  });
});
Panelと同様にrenderToの指定によりdivタグにボタンが描画されます。
追加されるタグは、次のようなテーブルで追加されるようです。
<div id="sample_button">
<table id="ext-comp-1001" class="x-btn-wrap x-btn" cellspacing="0" cellpadding="0" border="0" style="width: auto;">
<tbody>
<tr>
<td class="x-btn-left">
<i> </i>
</td>
<td class="x-btn-center">
<em unselectable="on">
<button id="ext-gen7" class="x-btn-text" type="button">Click Me</button>
</em>
</td>
<td class="x-btn-right">
<i> </i>
</td>
</tr>
</tbody>
</table>
</div>
ボタンがクリックされた場合の処理は、handlerへ関数を設定することにより処理を行うことが出来ます。
Ext.BLANK_IMAGE_URL = 'ext/resources/images/default/s.gif';

Ext.onReady(function() {
  new Ext.Button({
    renderTo : 'sample_button',
    text: 'Click Me',
    handler: function(){
      Ext.Msg.alert("Message","Hello World");
    }
  });
});
Copyright 1997-2010 BBB All rights reserved.